
How to Achieve Perfect Cils Lifting at Home
What is Cils Lifting?
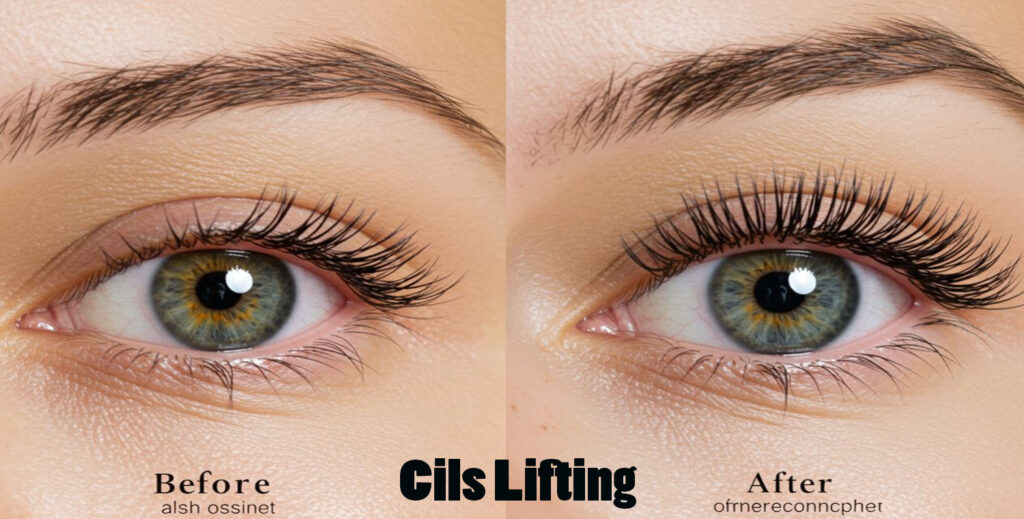
Cils lifting, or lash lifting, is a beauty technique that curls and lifts your natural lashes.
It enhances your eyes by giving the illusion of longer, fuller lashes without extensions.
The process uses silicone pads and safe chemical solutions to shape the lashes.
Unlike mascara or curlers, the results are semi-permanent and natural-looking.
This treatment is perfect for anyone seeking an effortless, wide-eyed look.
Trending Post: Cils Lifting
Why is It So Popular Today?
Cils lifting has gained popularity due to its low-maintenance beauty results.
It saves time in your daily makeup routine by eliminating the need for mascara.
The treatment can last for weeks, making it highly efficient for busy lifestyles.
Beauty influencers and professionals often recommend it for its natural finish.
More people now prefer DIY cils lifting to avoid costly salon appointments.
Benefits of Doing Cils Lifting at Home
Save Money
Salon lash lifts can be expensive, especially with regular maintenance.
Doing cils lifting at home costs a fraction of the price with reusable kits.
Many high-quality home kits offer salon-like results for less.
You only pay once for the tools and products, saving in the long run.
It’s a budget-friendly beauty solution without compromising on quality.
Comfort and Convenience
At-home cils lifting allows you to work in your own space and time.
You can relax in your pajamas while lifting your lashes—no appointment needed.
No waiting in salon queues or fitting into a busy schedule.
You control the pace, ensuring a stress-free beauty routine.
It’s perfect for introverts or those who prefer privacy.
Results that Last
A well-done at-home lash lift can last 6–8 weeks.
Consistency and proper technique can even improve durability.
Lifted lashes stay curled through showers and sleep.
You enjoy beautiful lashes daily without touch-ups.
The longevity rivals salon treatments when done correctly.
What You Need Before You Start
Tools and Products Required
You’ll need a lash lift kit with glue, perming and setting solutions.
Silicone pads of various sizes help shape your lash curl.
Clean applicators, cotton swabs, and lash combs are essential.
Use a gentle cleanser or micellar water for cleaning lashes.
A nourishing serum is great for post-lift lash care.
Safety Precautions
Always do a patch test 24 hours before applying any products.
Keep all chemicals away from your eyes to prevent irritation.
Use a mirror in good lighting and avoid multitasking during the process.
Follow instructions exactly as outlined in the kit.
Have a bowl of water and cotton pads nearby in case of emergency.
Step-by-Step Guide to At-Home Cils Lifting
Step 1 – Clean Your Lashes Thoroughly
Use an oil-free cleanser or micellar water to remove dirt and makeup.
Clean lashes allow the solutions to adhere properly.
Dry them gently with a lint-free towel before proceeding.
Any residue can prevent a successful lift.
Start with a fresh, clean base for the best results.
Step 2 – Apply the Silicone Pads
Choose the right size pad based on your lash length and desired curl.
Place the pad on your eyelid close to the lash line using adhesive.
Make sure it’s smooth and secure without gaps or wrinkles.
Pads should sit comfortably without poking your eyes.
This step sets the foundation for the lash shape.
Step 3 – Use the Lash Glue Carefully
Apply a thin layer of lash glue to the silicone pad.
Gently press your lashes upward onto the pad using a clean tool.
Work in small sections to ensure all lashes stick properly.
Separate overlapping lashes for an even lift.
Wait for the glue to dry slightly before applying the perming solution.
Step 4 – Apply the Perming Solution
Use a clean applicator to coat the mid-lash to tips with perm solution.
Avoid the lash roots and skin to prevent irritation.
Cover with plastic film or cling wrap to activate the formula.
Leave on for the recommended time (usually 8–12 minutes).
Do not exceed the time limit to avoid lash damage.
Step 5 – Apply the Setting Solution
Wipe off the perm solution gently with a cotton swab.
Apply the setting solution in the same manner.
This step locks in the new curl and sets the shape.
Cover again with cling wrap for another 8–12 minutes.
Follow your kit’s instructions closely for perfect results.
Step 6 – Nourish and Clean
Remove the setting solution gently using a clean cotton swab.
Use a nourishing oil or serum to hydrate and strengthen your lashes.
Carefully remove the lashes from the pad with cleanser.
Peel off the silicone pads without tugging your lashes.
Admire your freshly lifted, natural-looking lashes!
Tips and Tricks for Better Results
Choose the Right Pad Size
Pad size determines the curl intensity—smaller for tight curls, larger for gentle lift.
Match the pad to your natural lash length and eye shape.
Experiment with sizes if you’re unsure what looks best.
Too small a pad can cause over-curling or lash kinks.
Proper size enhances both lift and comfort.
Don’t Overprocess Your Lashes
Follow the exact time listed on your kit instructions.
Overprocessing can weaken or damage your lashes.
Always set a timer during each chemical step.
If in doubt, err on the side of caution with time.
Healthy lashes yield better, longer-lasting results.
Comb and Separate Lashes Gently
Use a lash comb to separate lashes after gluing to the pad.
Prevent crisscrossed or clumped lashes before applying solutions.
Be gentle to avoid pulling lashes off the pad.
A smooth arrangement ensures a flawless curl.
Precision here leads to professional-looking outcomes.
Common Mistakes to Avoid
Skipping Patch Test
Never skip a patch test, even if you’ve used the product before.
Allergic reactions can occur suddenly and painfully.
Apply a small amount behind your ear or on your wrist.
Wait 24 hours to check for redness or irritation.
Your safety should always come first.
Using Expired Products
Always check the expiration date of your lash lift kit.
Expired chemicals lose effectiveness and may harm your lashes.
Throw away any solution with a strange odor or color.
Store your products in a cool, dry place.
Fresh products ensure maximum results and safety.
Rushing the Process
Take your time for each step—don’t rush the lifting.
Skipping instructions can lead to poor results or lash damage.
Set aside at least 45 minutes for the full procedure.
Multitasking can increase the risk of mistakes.
Treat the process like a spa moment, not a chore.
Aftercare Instructions
What to Avoid for the First 24 Hours
Do not wet your lashes or expose them to steam.
Avoid makeup, mascara, or lash serums during this time.
Skip saunas, hot showers, or sweaty workouts.
Touching or rubbing your eyes can affect the curl.
Let your lashes set completely for long-lasting lift.
How to Maintain Lifted Lashes Longer
Use a lash serum to keep them strong and nourished.
Avoid oil-based makeup removers that weaken the lift.
Gently brush your lashes daily with a spoolie.
Sleep on your back to avoid crushing lashes.
With proper care, your lift can last 6–8 weeks.
Natural Alternatives for Sensitive Eyes
Castor Oil and Lash Curlers
Castor oil nourishes and slightly curls lashes over time.
Apply nightly using a clean brush for natural enhancement.
Pair it with a quality lash curler for added effect.
It’s a gentle, chemical-free alternative for sensitive users.
Though subtle, it promotes lash health and strength.
Homemade Lash Lift Serums
Mix aloe vera gel, vitamin E oil, and castor oil for a DIY serum.
Apply it nightly to clean lashes for a natural conditioning lift.
While not as dramatic as a perm, it enhances curl over time.
This option is ideal for those allergic to salon chemicals.
Always patch test homemade formulas before full use.
Final Thoughts
At-home cils lifting offers beautiful results with the right tools and care.
It’s budget-friendly, convenient, and can rival salon treatments.
Follow each step carefully and never compromise on safety.
Practice makes perfect, and each lift gets easier over time.
Soon, you’ll enjoy fluttery lashes without ever leaving your house.
FAQs
Q: Is cils lifting safe for beginners?
Yes, with a good kit and following instructions, beginners can safely do it.
Q: How often should I lift my lashes?
Every 6–8 weeks is ideal to maintain healthy, lifted lashes.
Q: Can I wear mascara after a lash lift?
Yes, but wait 24–48 hours and avoid waterproof formulas.
Q: What if I make a mistake during the process?
Stop immediately, rinse thoroughly, and seek guidance before retrying.
Q: Are there any side effects?
Mild irritation can occur if instructions aren’t followed; always patch test first.


Responses